Setting up TailScale on a Promox LXC

January 27th, 2025

Create a Ubuntu LXC on Ubuntu 24.04

Configure PVE for access the /dev/tun

/etc/pve/lxc/106.conf
lxc.cgroup2.devices.allow: c 10:200 rwm
lxc.mount.entry: /dev/net/tun dev/net/tun none bind,create=file

Install tail Scale
apt-get update

apt-get install -y curl

curl -fsSL https://pkgs.tailscale.com/stable/ubuntu/noble.noarmor.gpg | tee /usr/share/keyrings/tailscale-archive-keyring.gpg >/dev/null

curl -fsSL https://pkgs.tailscale.com/stable/ubuntu/noble.tailscale-keyring.list | tee /etc/apt/sources.list.d/tailscale.list

apt-get update

apt-get install -y tailscale

tailscale up –auth-key=tskey-auth-xxxxxxxxxxxxxxx –advertise-exit-node –advertise-routes=192.168.3.0/24

tailscale ip -4

Advertise Subnet Routes
echo ‘net.ipv4.ip_forward = 1’ | sudo tee -a /etc/sysctl.d/99-tailscale.conf
echo ‘net.ipv6.conf.all.forwarding = 1’ | sudo tee -a /etc/sysctl.d/99-tailscale.conf
sudo sysctl -p /etc/sysctl.d/99-tailscale.conf

Upgrading Promox

January 26th, 2025

https://pve.proxmox.com/pve-docs/pve-admin-guide.html#system_software_updates
??https://pve.proxmox.com/pve-docs/pve-admin-guide.html#sysadmin_package_repositories

apt-get update

apt-get dist-upgrade

Setting up Docker Client to connect to remote daemon using CLI

October 29th, 2023

On Docker Daemon

IP: 192.168.100.100

user@docker:~$ sudo systemctl edit docker.service

ExecStart=/usr/bin/dockerd -H fd:// -H tcp://127.0.0.1:2375

user@docker:~$ sudo systemctl restart docker.service

user@docker:~$ sudo netstat -lntp | grep dockerd
tcp 0 0 127.0.0.1:2375 0.0.0.0:* LISTEN 170/dockerd

On Docker Client

user@client:~$ ssh-keygen

user@client:~$ ssh-copy-id 192.168.100.100

user@client:~$ docker context create node2
–description “Node 2” \
–docker “host=ssh: //$TARGET _HOST”

user@client:~$ docker context use node2

user@client:~$ docker ps

CONTAINER ID   IMAGE                        COMMAND                  CREATED          STATUS         PORTS                                       NAMES

0cf710e9fdbf   hello:2          “/docker-entrypoint.???”   12 minutes ago   Up 7 minutes   1883/tcp                                    container-1

Allowing AWS console access from another AWS account

October 25th, 2022

In a scenario where you want to allow third party to access your AWS account, we can use Assume Role to facilitate the access.

Step 1. Create Role

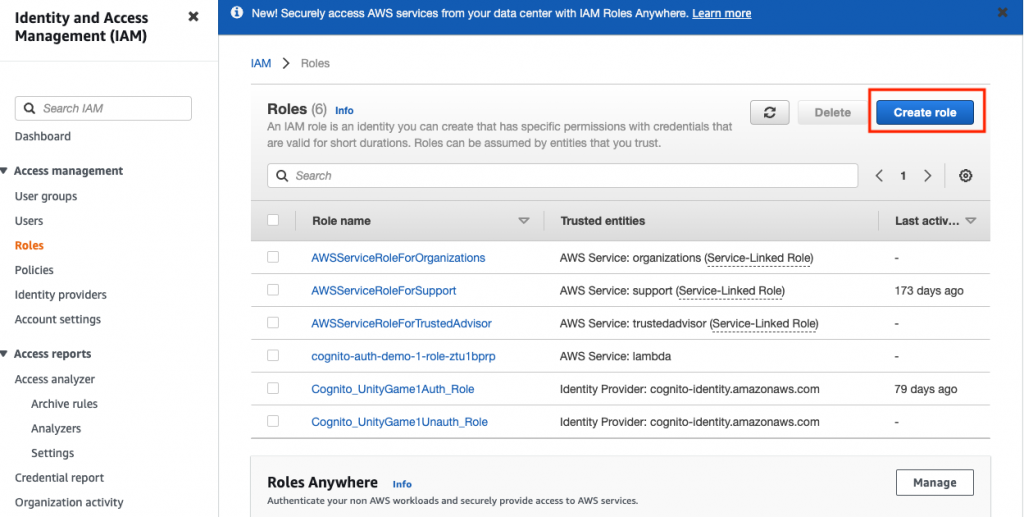
Login to your AWS account. Create Role – under IAM > Roles

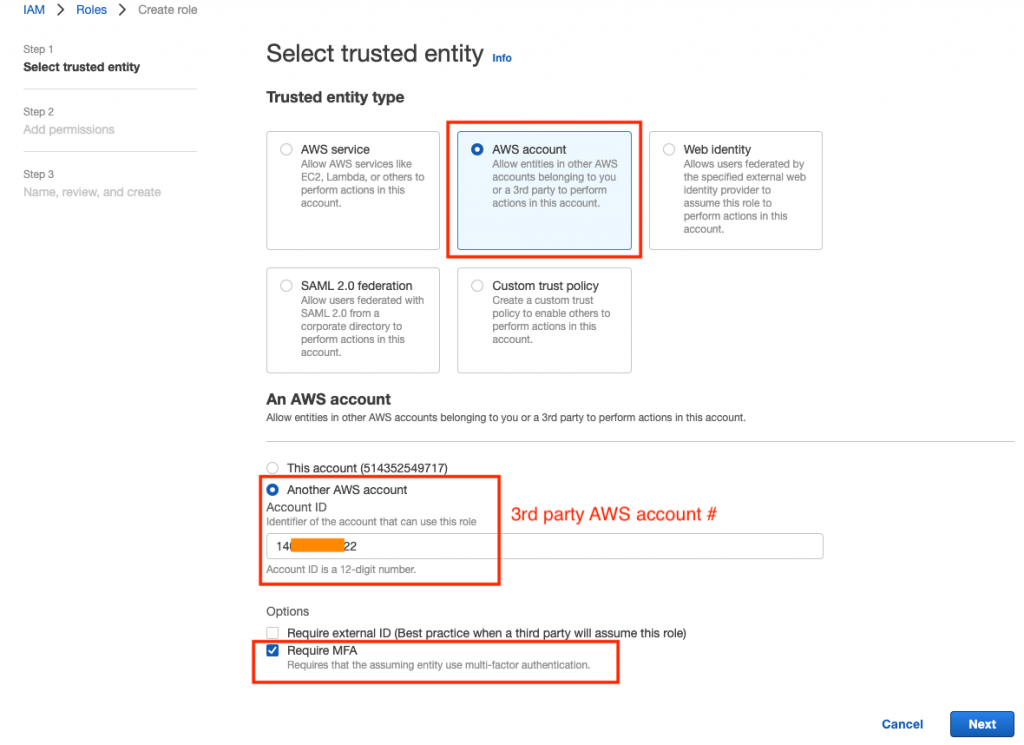
Defined Trusted Entity. Input the 3rd party AWS account number. Always require MFA for security best practise.

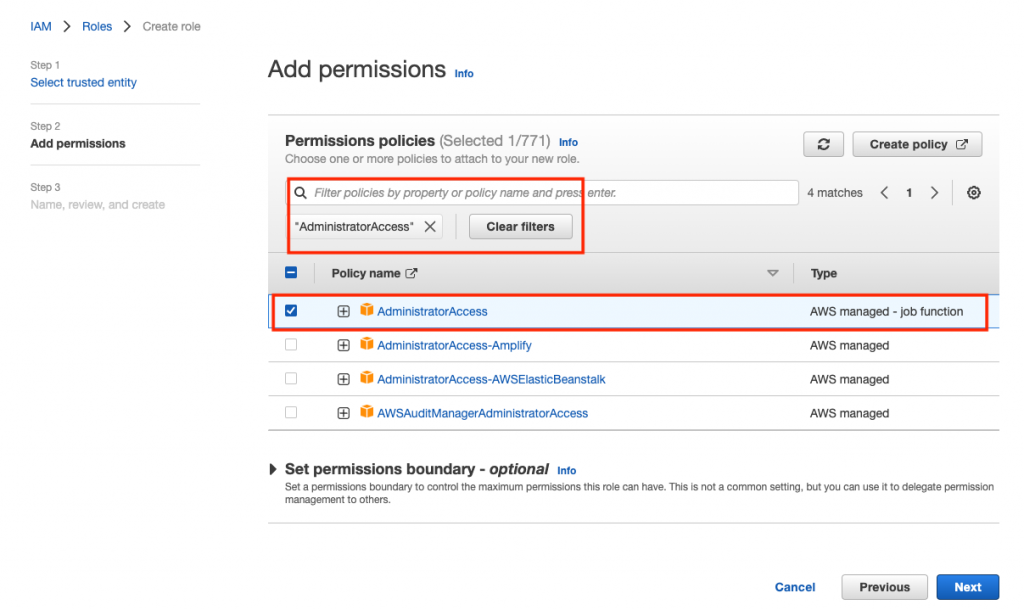
Select Permission Policy. AdministratorAccess will grant full access to the 3rd party. Use it with caution.

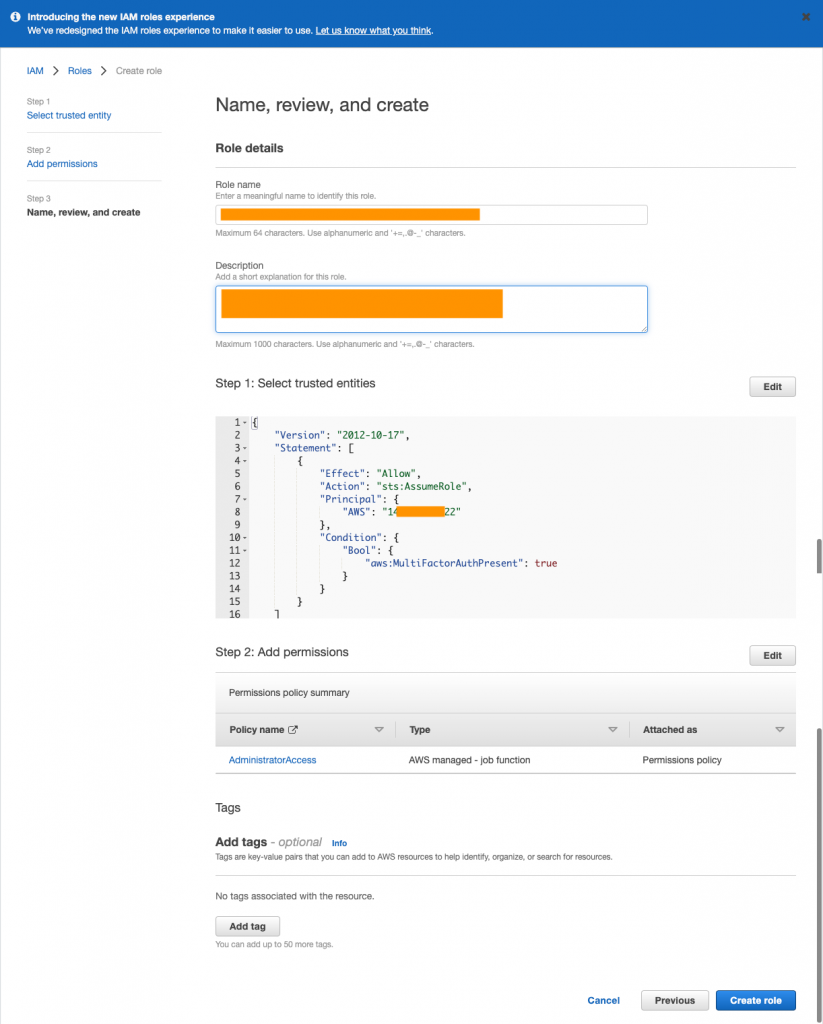
Assign a name and description of the policy, review and then create the Role.

Viola. You can copy the “Link to switch roles in console” to the third party.


Step 2. Third Party Access

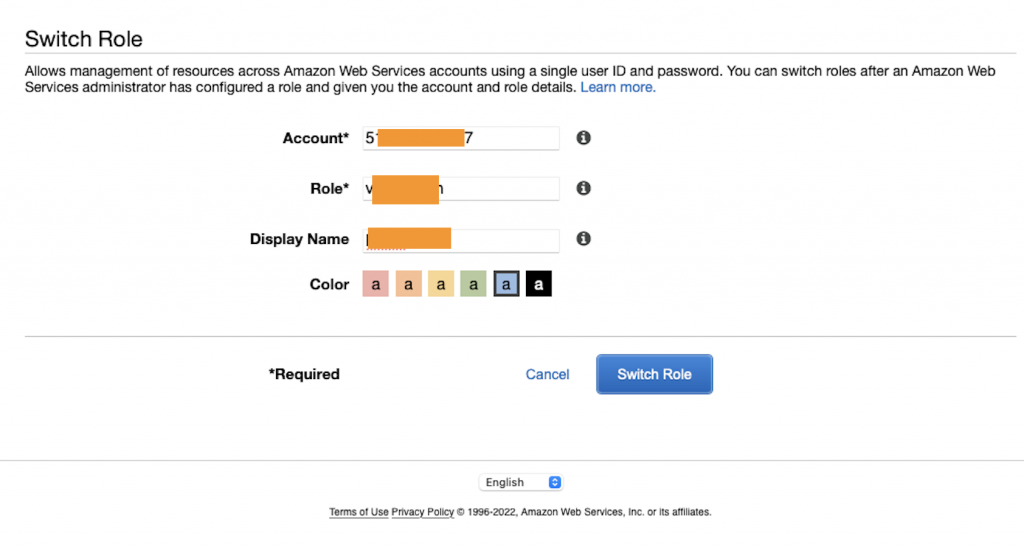
First, Third Party login to their own AWS account and open the switch role link from the previous step. The Account and Role field will be pre-populated. Give it a name, so you can easily remember what this is for.

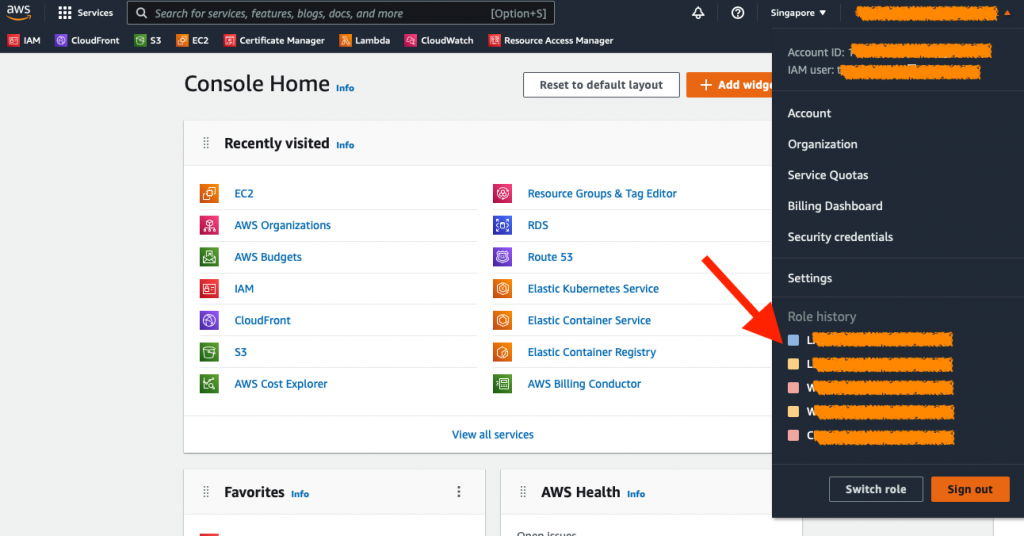
AWS Console keeps track of roles you have been used in the Role history menu.

Login to the container as root

October 7th, 2022
docker exec -it --privileged --user root container_id bash

Useful S3 CLI commands

September 14th, 2022

Create Bucket

aws s3api create-bucket --acl public-read \
--bucket bucket-20220914-s3-6 \
--region ap-east-1  \
--create-bucket-configuration LocationConstraint=ap-east-1

https://awscli.amazonaws.com/v2/documentation/api/latest/reference/s3api/create-bucket.html

Remarks – how to enable versioning, encryption

Delete Bucket

aws s3 rb s3://bucket-20220914-s3-6 --force

Prepare S3 bucket to serve Website

aws s3 website \
s3://bucket-20220914-s3-6 \
--index-document index.html 

Running a BusyBox container

March 1st, 2022

Running a temporary Linux Shell

docker run -it --rm busybox

MacOS 12 failed to SSH – no matching key exchange method found

January 19th, 2022

Unable to negotiate with 192.168.1.1 port 22: no matching key exchange method found. Their offer: diffie-hellman-group-exchange-sha1,diffie-hellman-group14-sha1,diffie-hellman-group1-sha1

Add to the bottom of /etc/ssh/ssh_config


KexAlgorithms +diffie-hellman-group1-sha1

Accessing AWS Member Account

December 22nd, 2021
  1. Open the AWS Management Console using IAM user credentials.
  2. Choose your account name at the top of the page, and then select Switch Role.
    Important: If you are signed in with root user credentials, you can’t switch roles. You must be signed in as an IAM user or role. For more information, see Switching to a role (AWS Management Console).
  3. Enter the account number for the member account.
  4. Enter role name: OrganizationAccountAccessRole
  5. (Optional) You can also enter a custom display name (maximum 64 characters) and a display color for the member account.
  6. Choose Switch Role.

Docker for Dummies

November 12th, 2021

Dockerfile

A Dockerfile is a text document that contains all the commands a user could call on the command line to assemble an image. Using docker build users can create an automated build that executes several command-line instructions in succession.

FROM node:12-alpine
RUN apk add --update --no-cache python2 g++ make
WORKDIR /app
COPY . .
RUN yarn install --production
CMD ["node", "src/index.js"]

Build a docker image

docker build -t <container-image> .

Scan for vulnerabilities

docker scan  <container-image>

Start a container

docker run -dp <host-port>:<container-port> --name <container-name> <container-image> 

Removing a container

docker ps

docker stop <container-id>
docker remove <container-id>

or

docker rm -f <container-id>

Stop and removing all running containers

docker stop $(docker ps -q)docker rm $(docker ps -a -q)

Execute a command inside a container

docker exec 
-t tty
-i interactive
docker exec <container-id> <cmd>
docker exec -i <container-name> <cmd>

start a shell in a container

docker exec -it <container-name> /bin/bash

Create a Persistence Volume

docker volume create <volume-name>

start a container with persistence volume – Named Volume

docker run -dp <host-port>:<container-port> -v <pv-volume-name>:<container-path> <container-image>

after docker v 17.0.6

docker run -dp <host-port>:<container-port> --mount type=<pv-volume-name>,source=<pv-volume-name>,target=<containter-path> <container-image>

create a named volume

docker create volume <volume-name>

Remove a named volume

docker volume rm <volume-name>

list persistence volume in docker – Named Volume

docker volume ls 

start a container with persistence volume – Binded Volume

docker run -dp <host-port>:<container-port> -v <host-path>:<container-path> <container-id>

after docker v 17.0.6

docker run -dp <host-port>:<container-port> --mount type=bind,source=<host-path>,target=<container-path> <container-id>

showing the console log

docker logs -f <container-id>

Create a dedicated network between app container and mysql container

docker create network <network-name>

docker run -d \
	--name <container-name> \
	--network <network-interface-name> \
	--network-alias <host-name> \
	--mount type=bind,source=<host-path>,target=<container-path> \
	-e MYSQL_ROOT_PASSWORD=<db-password> \
	-e MYSQL_DATABASE=<db-name> \
	<docker-image>

docker run -it -p 3000:3000 \
	--name <container-name> \
	--network <network-interface-name> \
	-e MYSQL_HOST=<db-host> \
	-e MYSQL_USER=<db-user> \
	-e MYSQL_PASSWORD=<db-password> \
	-e MYSQL_DB=<db-name> \
	<container-image>

Start a Network Troubleshooting container

docker run -it --network <network-interface-name> nicolaka/netshoot